Setting up googlemock with Visual C++ 2010 Express Edition

Following on from my last post about setting up googletest to use with Visual Studio 2010 express edition, this post builds on that by showing how to build, setup and test the googlemock libraries.

If you have read the previous post, then the basic steps are very similar.

First, download the googlemock zip file and unzip it to known location. As before, I suggest something easy, either C:\gmock-1.6.0, or as in my case C:\src\gmock-1.6.0. One useful fact is that all the gtest code is included as part of the gmock distribution. It can be found at \gmock-1.6.0\gtest.

Building the gtest libraries

It is the same process as build the gtest libraries. One importany note is that

The gmock libraries contain all the gtest code as well.

Navigate to the directory \gmock-1.6.0\msvc\2010 and open the Visual C++ project gmock (gmock.sln). You will end up with three projects.

image

Go ahead and build these (F7) and ignore any warnings. Once successfully built, look in the directory \gmock-1.6.0\msvc\2010\gtest\Debug and you will find two library files

  • gmock.lib
  • gmock_main.lib

Test the GMock Library

As part of the standard build two executable are created that allow a quick self-test of googlemock (gtest does have the same but I neglected to mention those in my previous post).

I recommend opening a command window and navigating to directory  \gmock-1.6.0\msvc\2010\Debug. There you will fine the file gmock_test.exe; go ahead and execute that [NOTE: I had two (of the 830) tests fail, which I’m not sure why (yet) – to be investigated]

image
This indicates that (most of) gmock functions correctly.

Building a Base GMock Project

A gmock project is the same as  a gtest project but with different project properties. Create a newWin32 Console Application  project.  Add a test fixture file to the project:

testFixture.cpp
  1. #include “gtest/gtest.h”
  2. TEST(setup_test_case, testWillPass)
  3. {
  4.     EXPECT_EQ(42, 42);
  5. }
  6. TEST(setup_test_case, testWillFail)
  7. {
  8.     EXPECT_EQ(42, 0);
  9. }

and exclude file containing default main from build.

Modify the project properties (Alt+F7) as follows:

  • Set gmock and gtest header include directories
    • C/C++ -> General -> Additional Include Directories
      • \gmock-1.6.0\include
      • \gmock-1.6.0\gtest\include
  • Add gmock libraries (instead of gtest libs)
    • Linker -> General -> Addition Library Directories
      • \gmock-1.6.0\msvc\2010\Debug
    • Linker -> Input -> Additional Dependencies
      • gmock.lib
      • gmock_main.lib
  • Modify Runtime Library:
    • C/C++ -> Code Generation -> Runtime Library
      • Multi-threaded Debug (/MTd).

Note here that we don’t have to include the gtest libraries as these are embedded in the gmock libraries. Build and run and we will see the familiar gtest output:
image

To test the gmock setup we need to create two classes:

  • The class to become the Unit-Under-Test (UUT)
  • An interface class that the UUT calls upon, which doesn’t have any implementation (or the implementation is target/hardware specific).

Interface Class

IWidget.h
  1. class IWidget
  2. {
  3. public:
  4.     virtual void On() = 0;
  5.     virtual void Off() = 0;
  6. };

Unit Under Test

WidgetController.h
  1. class IWidget;
  2. class WidgetController
  3. {
  4. public:
  5.     WidgetController(IWidget& w);
  6.     ~WidgetController(void);
  7.     void exec();
  8. private:
  9.     IWidget& myWidget;
  10. };
WidgetController.cpp
  1. #include “WidgetController.h”
  2. #include “IWidget.h”
  3. WidgetController::WidgetController(IWidget& w):myWidget(w)
  4. {
  5.     myWidget.Off();
  6. }
  7. WidgetController::~WidgetController()
  8. {
  9.     myWidget.Off();
  10. }
  11. void WidgetController::exec()
  12. {
  13.     myWidget.On();
  14. }

Testing using the Mock framework

To test using the Mock we need to:

  1. Include the gmock header [line 3]
  2. Create a mock class derived from the Interface class [lines 7-12]
  3. Create a test where the UUT calls on the interface on the mock object [lines 16-23]
  4. Set the mock objects expectation [line 20]. The mock expectation is that the Off member function will be called twice, once during WidgetController construction and once during destruction.
Using the mock
  1. // testFixture.cpp
  2. #include “gtest/gtest.h”
  3. #include “gmock/gmock.h”
  4. #include “IWidget.h”
  5. class MockWidget : public IWidget
  6. {
  7. public:
  8.     MOCK_METHOD0(On, void());
  9.     MOCK_METHOD0(Off, void());
  10. };
  11. #include “WidgetController.h”
  12. TEST(TestWidgetController, testConstructor)
  13. {
  14.     MockWidget mw;
  15.     EXPECT_CALL(mw, Off()).Times(2);
  16.     WidgetController wc(mw);
  17. }

Build and run

image

You can see gmock in action by simply changing the expectation, e.g. [line 6]

Failing Test
  1. TEST(TestWidgetController, testConstructor)
  2. {
  3.     MockWidget mw;
  4. //    EXPECT_CALL(mw, Off()).Times(2);
  5.     EXPECT_CALL(mw, Off());
  6.     WidgetController wc(mw);
  7. }

will result in the following failed test output:

image

Where next?

Once you have a working project, the documentation on the Googlemock site is excellent. Start with Googlemock for Dummies.

Posted in C/C++ Programming, Testing | Tagged , | 2 Comments

Setting up googletest with Visual C++ 2010 Express Edition

So on an Embedded, Real-Time blog why am I taking about Visual C++ and googletest?

With the growth and acceptance of agile techniques, such as Test Driven Design (TDD), which is very well explained in James Grenning’s book Test Driven Development for Embedded C, we now have a set of tools and techniques that are:

  • Natural to use (as they use the native language)
  • Easy to use (to varying degrees)
  • Free

that allow the quality of embedded software to be significantly improved prior to target based testing.

However, It is important to note that TDD does not solve (or even address) may of the complications of developing and testing software for an embedded environment, but at the same time it should not be ignored.

So why Visual C++ express edition and googletest?

First, Visual C++ is not my first tool of choice, this selection came from working with a customer, it was their choice. Saying that, the express edition is free to use (I am assuming you will be using a professional cross-complier for target development) and it has become one of the best standards conforming C++ compilers around. Also I am not claiming to be a Visual C++ expert as I don’t develop software targeted at Windows.

googletest (gtest) is, in my experience to date, by far the easiest unit testing framework around for testing C++. For testing C I prefer Unity, which I’ll discuss in a later post. googletest is also supported by googlemock (gmock), which is an essential part of being able to use a unit testing framework for host testing of embedded software (my next post will look at setting up gmock). Finally, gtest was also part of the customers requirements.

As with many of these projects, all the information is out there, but what I hope to do is save you a little of the pain I went through getting the project setup and working.

I will assume you have Visual C++ 2010 express edition installed, if not go ahead and install it following the default Microsoft process.

Next, download the googletest zip file and unzip it to known location. I suggest something easy, either C:\gtest-1.6.0, or as in my case C:\src\gtest-1.6.0.

Building the gtest libraries

This couldn’t be easier. Simply navigate to the directory \gtest-1.6.0\msvc and open the Visual C++ project gtest (gtest.sln).

image

You will be asked to convert the project from an older format to a newer one. Go ahead and do this. Finally you’ll end up with four projects:

image

Go ahead and build these (F7) and ignore any warnings. Once successfully built, look in the directory \gtest-1.6.0\msvc\gtest\Debug and you will find two library files

image

These are Debug build libraries (the ‘d’ in the library name indicates this). If you want Release build libraries then change the build option to Release and rebuild. You will find the library files gtest.lib and gtest_main.lib in \gtest-1.6.0\msvc\gtest\Release. However, for the purposes here I’m assuming we only need to work with Debug builds.

Building a Visual C++ gtest Project

The key steps to build a gtest project are:

  • Create a new project
  • Win32 Console Application
  • Add test fixture file
    • and remove default main
  • Configure project properties
    • Additional Include Directories
    • \gtest-1.6.0\include
  • Add gtest (debug) libraries
    • gtestd.lib
    • gtest_maind.lib
  • Modify Runtime Library:
    • Multi-threaded Debug (/MTd)

    Continue reading

    Posted in C/C++ Programming, Testing | Tagged | 4 Comments

    The Five Orders of Ignorance

    It’s not often you read a paper that has something unique and fresh to say about a topic, and expresses it in a clear and concise way.

    Somehow, Phillip Armour’s The Five Orders of Ignorance had eluded me, until I found it referenced in another paper.

    It really is an interesting point of view on software development.  You can read the paper here.

    Armour’s central tenet is software is a mechanism for capturing knowledge. That is, (correct) software is the result of having understood, and formalised our knowledge about the problem we are developing.

    Clearly, at each stage of the development process we have different levels of knowledge (or ignorance; the conjugate of knowledge) about our problem.  As we move towards delivery our knowledge increases; and our ignorance decreases – hopefully!

    A stratified, or layered, model of ignorance gives a good measure of our progress through the development – in some ways a far superior model than the traditional time/artefact/activity–based approach.

    Armour’s levels – or orders – of ignorance are as follows:

    Zero Order Ignorance is knowledge; something we know and can articulate (in software)

    First Order Ignorance is something we don’t know; a question we need an answer to.

    Second Order Ignorance are the things we don’t know we don’t know.  That is, we don’t even know what questions to ask.

    Third Order Ignorance is lack of methodology – we don’t have techniques, tools or processes that can identify and illuminate our lack of knowledge.

    Fourth Order Ignorance means we don’t even know there are orders of ignorance!

    (In many ways Armour’s work is a far more cohesive version of Donald Rumsfeld’s infamous “Known Knowns” speech.)

    Armour’s paper crystallised a couple of very important points to me:

    Why requirements analysis is so vital.

    For nearly the last decade I have been promoting the importance of requirements analysis as a key part of development.  If we understand the problem we are meant to solve – completely and with precision – developing a solution in software is relatively straightforward. 

    It’s heartening that most engineers are actually pretty good at developing solutions. But they’re not really very good at understanding problems. When people call me in to help with ‘design issues’ it’s most commonly the case they don’t actually understand their problem properly. Usually, I help their ‘design’ skills by doing detailed requirements analysis with them!

    I have found the teams that spend most time performing requirements analysis spend the least time designing and debugging and have the most comprehensive and maintainable solutions.  This is because their software captures the system knowledge efficiently and their code isn’t riddled with what Armour calls ‘unknowledge’ – irrelevant, or incorrect knowledge about the system captured as code (you know, the stuff that leads to ‘features’!)

    What process is all about.

    Processes are a technique to give you questions, not answers. I think this upsets many developers (and their managers).  Many people want handle-turning solutions: Feed in some customer requirements, crank the handle, and out comes lovely, pristine software. 

    Unfortunately, but the world doesn’t work like that.  If it did, we’d all be replaced by machines (that’s been threatened since the Sixties and it hasn’t happened yet. I’m not holding my breath, either.) 

    Every software problem is unique and full of those delicious little subtleties that make our jobs as embedded developers so interesting (and yes, you can take ‘interesting’ in the sense of the old Chinese curse!) There is simply no way you can mechanise the behaviours needed to elicit, understand and formalise all the knowledge required to develop a typical embedded system.

    Most approaches to software process description assumes software development is a (linear) mechanical process; and the (procedural) transformation of input artefact to output artefact will (somehow) produce working software.  Whilst this approach works for other manufacturing processes it cannot deal with the simple fact that software development is about knowledge capture and, well, we often don’t know what we don’t know!

    The best processes are those that consist of a set of goals and a corresponding set of methodologies.  The goals effectively give you an appropriate set of questions that must be answered before you can continue; the answers to those questions will yield pertinent information about the system. 

    One could argue the artefacts are supposed to embody the appropriate design questions but engineers are notorious for simply filling in the blanks with banal waffle just so they can move on to the interesting stuff – that is, hacking code (and learning about the system!)

    Posted in Design Issues | Tagged , , , | 2 Comments

    Overcoming Name Clashes in Multiple C++ Interfaces

    Interfaces

    One of our key design goals is to reduce coupling between objects and classes. By keeping coupling to a minimum a design is more resilient to change imposed by new feature requests or missing requirements[1].

    An Interface represents an abstract service. That is, it is the specification of a set of behaviours (operations) that represent a problem that needs to be solved.

    An Interface is more than a set of cohesive operations. The Interface can be thought of as a contract between two objects – the client of the interface and the provider of the interface implementation.

    The implementer of the Interface guarantees to fulfil the specifications of the Interface. That is, given that operation pre-conditions are met the implementer will fulfil any behavioural requirements, post-conditions, invariants and quality-of-services requirements.

    From the client’s perspective it must conform to the operation specifications and fulfil any pre-conditions required by the Interface. Failure to comply on either side may cause a failure of the software.

    Continue reading

    Posted in C/C++ Programming, UML | Tagged , , , | 1 Comment

    Effective Testing: The “Swiss Cheese” model

    Why do we test?

    Software development is a collaborative effort. You bring in input from customers, managers, developers, and QA and synthesize a result. You do this because mistakes in requirements or architecture are expensive, possibly leading to lost sales.

    When we develop products we want them to be successful. We want our customers to buy, enjoy, and recommend our products or services. In other words, we want to build quality products. In this case, quality means four inter-related things:

    • Compliance quality– Can we demonstrate that the software fulfils its requirements?
    • Intrinsic quality – is the product robust, reliable, maintainable, etc?
    • Customer-perceived quality – How does the customer react to our product on a sensory, emotional level?
    • Fitness for Purpose– does our product fulfil the stakeholder’s needs?

    Which of these types of quality is most important to us depends a lot on our problem domain and the goals and driving forces of our business.

    We take considerable pains (but not enough in most cases – but that’s a different argument!) to analyse, design and implement our system to meet our quality goals. Unfortunately, engineers are not perfect. They are under increasing pressure to deliver more features, in less time, and as a consequence they do not have the luxury of time to learn the problem domain, or examine their solutions.

    As a consequence engineers make mistakes. These mistakes appear as corruptions in the translation from a specification (what to do) to an implementation. An error can occur wherever we translate a specification to an implementation.

    clip_image002

    Figure 1 – Typical errors in embedded systems


    This raises an important question – how to you measure confidence in a product? That is, how do we know the quality of our product is good enough that we can release it for production?

    The simple answer is: we test.

    Or, perhaps more correctly: we perform validation and verification activities.

    A note on definitions

    for this article I will use the following meanings for validation and verification. I’m being explicit because every development group I’ve spoken to uses a different word (or combination of them!) to describe the same concepts.

    Verification

    Verification confirms some predicate about the system. Verification confirms the existence (or non-existence) of, state of, value of, some element of the system’s behaviour or qualities. Put simply, verification asks questions that yield a yes/no answer.

    Validation

    Validation is focused on assessment of system predicates, rather than their confirmation. In other words, validation asks the question: should the system actually perform a particular behaviour or have a particular quality. Validation assesses the system in terms of good/bad.

    Just to confuse matters, I will use the terms validation and verification (V&V) and testing interchangeably.

    Introducing the “Swiss Cheese” approach to testing

    Testing is often the last resort for finding mistakes. A requirements specification is produced, a design created and implemented. Then, testing is used to verify the design against the requirements and to validation both the design and the requirements. Testing cannot be a perfect technique. Done poorly, many faults will still remain in the system.

    image

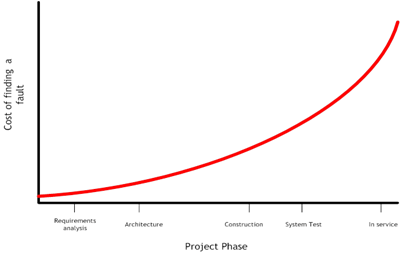
    Figure 2 – The cost of finding – and fixing – a bug


    This is a well-known graph. It shows the (relative) cost of finding – and fixing – a fault in a system throughout the lifecycle of the project. In simple terms it shows that it can cost orders of magnitude more to find and fix a problem at the end of the development lifecycle than during the early stages; and even more once the project is in service.

    A key point to note is: Testing does not improve your software. Testing is not about proving the software has no faults. (This is impossible!) Testing is a quality improvement technique. It provides evidence – in the form of testing metrics – to support the engineers’ claims (that their design works and is valid).

    Just testing the software doesn’t make it better:

    • Testing just identifies the faults

    Fixing the faults makes the software better (although, not always!)

    And simply writing more tests won’t make your software better – You must improve your development practices to get better software. The more testing you do the better your product confidence should be – provided you perform good tests!

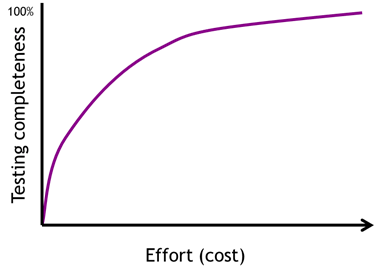
    Closing the holes (improving) testing requires effort and costs money. Moreover, the more sophisticated, rigorous and detailed you make any particular testing technique the more it will cost. In fact, there is a non-linear increase in the costs of applying a technique:

    image

    Figure 3 – The cost of improving any particular testing technique


    Trying to ‘perfect’ one technique – for example, black-box unit testing – is not a cost-effective way to gain product confidence. Using multiple, independent techniques (each playing to their own strengths) is far more effective.

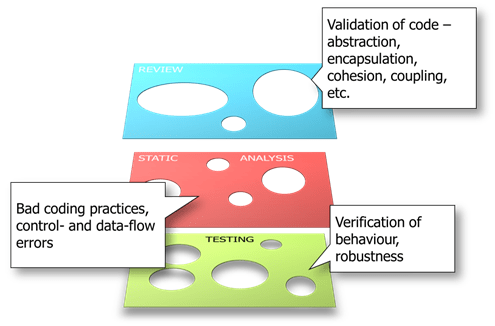
    The “Swiss Cheese” approach to testing uses multiple techniques, each with a different focus. The techniques are applied with the clear knowledge that no technique is perfect (nor should it be) but the flaws in any one technique do not overlap (much!) with the flaws of another layer.

    image

    Figure 4 – the Swiss Cheese model


    The Error-Fault-Failure chain

    clip_image010

    Figure 5 – The Error-Fault-Failure chain


    The Error-Fault-Failure chain shows the propagation of mistakes through the development lifecycle. Mistakes made by engineers lead to errors; errors are manifested as (latent) faults – code just waiting to go wrong!; in some cases a fault may lead to the system deviating from its desired behaviour – a failure.

    Clearly finding latent faults before they become failures is more effective than just trying to detect failures; and finding errors that lead to latent faults is more effective still.

    Dynamic Testing

    Dynamic Testing focuses on identifying failures.

    Black box testing is concerned with measuring the correctness of the system’s behaviour, performance or other quality. Black box testing is therefore primarily a verification technique.

    Black box testing tests specification without knowledge of implementation. The unit under test is stimulated via its interface(s). Black box testing requires a complete, consistent unambiguous specification to test against.

    Black box testing typically involves isolating a subset of the system and executing it in isolation in a simulated environment.

    White box testing, or Coverage testing is about establishing confidence in the structure of the code. Coverage testing focuses on the rigour of the dynamic testing process.

    Coverage testing is not concerned with verification or validation but with ensuring all code has been adequately exercised. The motivation is that code that has not been executed during testing may have faults in it; and it we don’t check that code the faults may manifest themselves when the system is in service.

    Dynamic testing involves execution of the software in a (simulated and, later in the develop cycle, live) environment.

    clip_image012

    Figure 6 – Environments for executing dynamic tests


    Dynamic testing does not find latent faults effectively. The amount of effort required to find potential failures in your code is extremely high.

    Static Testing

    Static testing, using Static Analysis tools, look for latent faults in code.

    Static Analysis tools is a generic description for tools that aid verification without having to execute software.

    There are (currently) more than three dozen tools on the market. Most are commercial tools, but there are many academic-based tools. There are a small number of free- or share-ware tools available, also.

    clip_image014

    Figure 7 – Categorisation of static analysis tools


    These tools are nearly always language specific – that is, there are tools for C, C++, Java, etc.

    They are commonly based on compiler technology, since the initial stages of static analysis are the same as those required for compiling code.

    Pattern Matching tools

    Pattern matching tools look for dangerous expressions. .Grep-like tools search for known incorrect patterns. They can be useful for simple latent faults and enforcing style standards in code.

    Semantic Analysis tools

    Semantic analysis tools are based on compiler (parser) technologies. They use the first stages of the compilation process to build an Abstract Syntax tree. The parse tree in enhanced with additional semantic information. The enhanced Abstract Syntax tree is then evaluated against a rulebase looking for violations.

    Symbolic Execution tools

    Symbolic execution tools look at data-flow analysis. Symbolic execution tools are less concerned with language level constructs and instead focus on how data is created used and destroyed.

    Abstract Interpretation tools

    Abstract Interpretation involves treating the code as an abstract mathematical characterisation of its possible behaviour. The model is then executed to examine its behaviour (for faults).

    There is a considerable overlap between Abstract Interpretation, Symbolic Execution and Semantic Analysis in most commercial tools.

    In practice most commercial tools use a number of techniques, both to provide better analysis and also to minimise the shortcomings of each of the techniques.


    clip_image016

    Figure 8 – There is considerable overlap between commercial SA tools


    Most tools will have a bias towards one particular technique. When choosing a tool it is prudent to consider where the tool’s bias lies and whether that suits your usage of static analysis techniques. In some cases you may consider buying more than one static analysis tool.

    Static Analysis tools focus on the use (or misuse) of programming language. They cannot make any meaningful judgements on design issues – for example cohesion, coupling, encapsulation of abstraction flaws in the system’s design.

    Review

    Judgements on design, system evaluation, measures of good/bad, and other aspects of validation cannot be automated easily. The most effective technique to find mistakes in these aspects is human review.

    In the past reviews have focused on (attempting to) find latent faults in code by detailed inspection. Unfortunately, this is something humans are particularly bad at so it becomes an activity that either 1) takes a long time or 2) is very poorly executed (that is, merely given lip-service).

    The strength of human review is the ability of humans to build abstract representations and evaluate them. Thus reviews should focus on the things tools can’t automate – design, modularisation, evaluation, intrinsic quality, etc.

    Applying the Swiss Cheese model

    In the Swiss Cheese model no technique has to be perfect. Each technique is used for its strengths with the knowledge faults not found by one technique may be caught by another.

    Some faults will still get through, though!

    clip_image018

    Figure 9 – In this Swiss Cheese approach no technique needs to be perfect


    The aim is to spread our effort across multiple techniques to get the most effective result for the minimum effort.

    Consider: If we are not particularly diligent with any particular technique, such that each technique only finds 50% of the mistakes at each level, with three different levels we have the potential to find 87.5% of the mistakes in the system. And this without disproportionate effort in any area. (and yes, I know this is a somewhat optimistic and simplistic scenario)

    Posted in Testing | Tagged , , , , , , | 3 Comments

    More appalling user interface design

    I came across a wonderfully counter-intuitive piece of user interface design this week.

    The room I was in had a sliding shutter (that, for reasons best known to the architects, opened into the main building and not outside).  The two halves of the shutter are controlled independently – that is, you can close one side or the other, or both.  Each shutter is controlled with independent switch panels.

    Common sense would suggest a single rocker switch: pushing one side would close the shutter; pushing the other would open it.  The designers, however, had other ideas and selected the implementation below:

    Annotated interface


    Each shutter has a pair of single-action switches – one to close the shutter (the one at the top) and one to open the shutter.

    Pressing the top switch (on its right hand side) closes the shutter – as expected.

    Pressing the bottom switch on its left hand side (the intuitive action) does nothing.  In fact, you have to press the bottom switch on its right hand side to get it to do anything.

    Even better, the switch panel for the right shutter is an exact copy of the the left; so the controls are completely opposite  – the top switch opens the shutter, the bottom switch closes it!

    As they say:  good design is like oxygen – you don’t notice it until it’s not there.

    Posted in Design Issues | Tagged , , | Leave a comment

    Radio Silence

    I would like to apologise about the lack of posting in the last couple of months. Unfortunately due to an unprecedented workload both Glennan and myself have been pretty much maxed out, meaning we have neglected the blog. I’m hoping we can remedy this very soon; not due to a lower workloads but as we are recruiting to expand the Technical team here at Feabhas (if this may be of interest please feel free to contact me via LinkedIn or directly).

    Thanks for all your great feedback and words of encouragement regarding the blog.

    Niall.

    Posted in General | Leave a comment

    Releasing Code

    The Release process

    The Release process defines the actions required to deliver a software product to an external customer. The external customer is any entity outside the development department. This may be a true (paying) customer, or may be another engineering department, for example Testing or Production.

    The Release process is a triggered activity. The trigger events are scheduled as part of project planning. Defining a release is a project milestone which must define

    • What will be released
    • When it will be released
    • Who it will be released to


    Release process relationships

    The Release process is related to, but independent of, the Change Management, Revision Control and Build Processes.


    image

    Figure 21 – Release management is related to, but independent of, the other CM practices

    Change Management

    Defines the modifications and/or additions to the product, the order in which the changes are incorporated.

    Revision Control

    Ensures the configuration of the product is controlled and reproducible.

    Build Process

    Defines how to build the product.

    Release Process

    Defines the target recipient of the product.


    Software release stages

    During development the product may be released:

    • To different standards
    • To different customers

    The different releases comprise a release lifecycle, with each stage representing an improvement in product quality (Figure 22).


    image

    Figure 22 – Each release type represents a different level of quality, and may be released to different customers
     
    Development releases

    Development releases are internal releases; usually to (independent) test. These releases are unlikely to be ‘feature-complete’; often the release represents one or more work packages (or, in the case of Agile projects, features or ‘sprints’).

    It is not expected that these early releases are perfect. It is likely they have only undergone developer testing. A significant number of bugs can be expected in early releases.

    Development releases may be produced at high frequency. Weekly releases would be expected at the beginning of development, possibly rising to daily as the project enters a debug phase.

    Alpha and Beta

    Alpha and Beta releases focus on usage and/or useability testing. Sometimes these are known as Technical Preview releases. The product may be feature-complete (or close) at this stage. Alpha/Beta releases are relatively stable and should contain no (known) critical bugs.

    Alpha testing consists of simulated or actual operational testing. It is normally carried out in-house and performed by non-development users, for example internal proxy-customers (staff acting on behalf of the ‘real’ customers).

    Beta testing is also operational testing. It is often performed out-house (that is, outside the control of the development organisation). It is carried out by focus groups, or specially selected users. Very often Beta releases are made available free to existing customers to use and test in their own environment.

    It is important not to begin Alpha and Beta releases too early in the development cycle. Although allowing users to test the product is potentially very effective a product with many bugs (particularly in areas of key user functionality) can lead to a loss of confidence in the product that is very difficult to recover.

    Production-ready releases

    The term Release candidate refers to a version with the potential to be a final product. It is essentially ready to release unless fatal bugs emerge during final testing (or possibly Alpha or Beta testing). The product features all designed functions and no known critical bugs.

    A Production release is very similar to a Release Candidate ( in fact, it could be argued the Production release is just the final release candidate!). Any last minute bugs fixed. The Production release represents final product quality and features, and it the release sent to Production engineering.

    Posted in Design Issues | Tagged , , , , , , , , | 3 Comments

    enum ; past, present and future

    The enumerated type (enum) is probably one of the simplest and most underused  features of the C and C++ which can make code safer and more readable without compromising performance.

    In this posting we shall look at the basic enum from C, how C++ improved on C’s enum, and how C++0X will make them a first class type.

    Often I see headers filled with lists of #defines where an enum would be a much better choice. Here is a classic example:

    /* adc.h */
    #define ADC_Channel_0                               (0x00) 
    #define ADC_Channel_1                               (0x01) 
    #define ADC_Channel_2                               (0x02) 
    #define ADC_Channel_3                               (0x03) 
    #define ADC_Channel_4                               (0x04) 
    #define ADC_Channel_5                               (0x05) 
    #define ADC_Channel_6                               (0x06) 
    #define ADC_Channel_7                               (0x07) 
    #define ADC_Channel_8                               (0x08) 
    #define ADC_Channel_9                               (0x09) 
    #define ADC_Channel_10                              (0x0A) 
    #define ADC_Channel_11                              (0x0B) 
    #define ADC_Channel_12                              (0x0C) 
    #define ADC_Channel_13                              (0x0D) 
    #define ADC_Channel_14                              (0x0E) 
    #define ADC_Channel_15                              (0x0F) 

    which probably would be better re-written as:

    enum ADC_Channel_no {
    	ADC_Channel_0,
    	ADC_Channel_1,
    	ADC_Channel_2,
    	ADC_Channel_3,
    	ADC_Channel_4,
    	ADC_Channel_5,
    	ADC_Channel_6,
    	ADC_Channel_7,
    	ADC_Channel_8,
    	ADC_Channel_9,
    	ADC_Channel_10,
    	ADC_Channel_11,
    	ADC_Channel_12,
    	ADC_Channel_13,
    	ADC_Channel_14,
    	ADC_Channel_15
    };

    Before getting onto the advantages and disadvantages of enum’s, let’s have a quick review.

    Continue reading

    Posted in C/C++ Programming | Tagged , , , , , | 3 Comments

    Change Management

    Change Management is concerned with the proposal, selection and scheduling of changes during the lifecycle of a project.

    Change Management is interlinked with, but separate to, Revision Control.

    Change Management is the core to controlling your development processes. Without effective Change Management the management of your project is subject to slavish adherence to a (fixed, and pre-determined) project plan, with no mechanism for dealing with inevitable changes in requirements, design, implementation or testing.

    It is no surprise that Change Management is at the heart of so many Agile process, such as SCRUM.

    Change Request

    The core of Change Management is the Change Request (often abbreviated simply as CR) A Change Request has many different names, all meaning the same thing:

    • Change Note (CN)
    • Engineering Change (Order)
    • Engineering Change Request (ECR)
    • Action Request (AR)
    • Request For Change (RFC)

    Essentially, a Change Request is a call for an adjustment to a system. Change requests typically originate from one of five sources (Dennis, Wixom, & Tegarden, 2002):

    • Bugs that must be fixed
    • System enhancement requests from users
    • Events in the development of other systems
    • Changes in underlying structure and or standards
    • Demands from senior management


    The CR Artefact

    A CR is a project artefact – that is, it is a entity that is created, worked on, stored and audited, just like every other artefact in the system. The CR represents the lifecycle of a change. As such it has a different lifecycle to other artefacts.

    As an artefact the CR may (in fact, should) also be held under revision control.

    The CR lifecycle is shown in Figure 19. There are three main parts to the lifecycle.


    image

    Figure 19 – The Change Request is an artefact with its own unique lifecycle

     
    Opening the CR

    Creating a CR records that some change to the system is requested; it does imply that the work will be performed. Once created the change must be reviewed before it can be worked on. The review is performed by the Change Control Board (CCB). The CCB consists of stakeholders who will be affected by the change, and those who can decide whether the change is worth doing. At the minimum this will be the Project Manager or Team Leader; but may include a multi-disciplinary group including engineering, senior management, marketing, customer support, etc.

    The CR must be assessed for impact to the project. This work should ideally be done by the CR submitter. Points considered during the assessment of a change request include:

    • Technical feasibility
    • Timescales
    • Customer expectation
    • Resource
    • Quality
    • etc.

    The CR may be Accepted (Opened for working), Rejected (Infeasible or invalid) or Deferred (delayed; therefore inducing technical debt to the project)

    Open CRs

    Once opened project artefacts can be modified. Each artefact follows its own Configuration Item lifecycle (Figure 20). The CR records artefacts modified. Each artefact records the changes made in support of the CR.


    image

    Figure 20 – Each artefact modified under the Change Request follows its own change lifecycle
     
    Including the change

    The completed change should be reviewed again by the CCB. The purpose of the review is to assess whether the change is valid – That is, do the modifications made to the system correctly addresses the change requested? An invalid change will be rejected for rework.

    Once accepted the change can be integrated into the product.


    Change Management is often overlooked in CM. Change Management controls precisely what is going to change in the project and when. Without Change Management a project is running on ad hoc and unrecorded decisions by the development team or project manager and runs a serious risk of heading out of control.  Although the Change Management presented here involves project artefacts (CRs) many Agile processes adopt similar principles using techniques such as Product Backlogs and Feature Lists (SCRUM), which are organised by customer priority. These mechanisms are, in effect, simple Change Management processes.

    Posted in Design Issues | Tagged , , , , , , | Leave a comment